

Backpack was a hit yesterday. You know when you make something and put your heart and soul into it and then....NOTHING. Nobody cares. No reaction. NOTHING!!!! THIS was not one of those projects. I got a hug, a kiss, a thank you, and little happy dance, some jumping up and down, and a run around the yard. CAN'T beat a response like that.
SOOOO anyway...this is a simple little backpack made from an old hooded sweatshirt. How can you resist a FREE project??? If you wanna ACTUALLY read through the tutorial....its after the jump ( I didn't wanna bore all of you unsuspecting NON Dora fans!!)
Needed Supplies
1. Purple hooded sweatshirt--the larger the better (mine had writing on it---I just used that part for the INSIDE of the bag--no biggie). Purple fleece would also work, but THAT would require a trip to the store AND I have about 12 purple hoodies because I went to and then worked at a PURPLE high school:)
2. interfacing/fusible fleece
3. Felt or t-shirt scraps for face
4. a small piece of velro, or a snap or button
5. paper for making the pattern
6. sharpie
7. all the usual sewing supplies
STEP 1: Make a pattern. I just taped 2 pieces of printer paper together and free-handed the shape of the backpack. Then I held the pattern up to my 3 year old, realized it was JUMBO and scaled it down. My suggestion. Find a picture of BACKPACK on the internet and use it as a reference for EVERYTHING. I used THIS one (yes you can BUY a backpack if you want). Hint: draw your shape and then fold it in half and cut it so that both sides are exactly the same.


STEP 2: Cutting. I cut my sweatshirt down ONE side and opened it up so that I had one BIG piece of fabric. I also cut off the hood, cut off the waistband and arms, and unpicked the front pocket and removed. That gave me the most usable fabric---you will need everything (I only had a medium sweater and could have used MORE fabric).
You need to cut out 4 backpack shaped pieces. 2 of them need to have no writing (the actual bag)---the other 2 it does not matter (the lining). You also need 2 pieces of interfacing cut in the backpack shape.
You also need 4 LONG strips of fabric. Here is where YOU get to decide. These will determine how FAT your bag will be. Mine is about 4 inches, so my strips were 5 inches wide (ish). They need to be long enough to go half way around the backpack. SOOO from the mid bottom, around the corner, and up the side. You also need 2 strips of interfacing the same size. CLEAR AS MUD??? Hope NOT!!!
You will also need a map pocket and a flap, but I will have you cut them later so they FIT your actual bag....just didn't want you to throw you fabric away before we were done with it.


You also need 2 strap pieces. Mine were 3.5 inches wide and 15 inches long. I just grabbed my little girlie and measured to see how long I wanted them....purely scientific:) I used the sleeves for this. Just a thought so that you do not run out of fabric.
AFTER cutting everything, iron your interfacing pieces to your OUTER bag. You could probably SKIP the interfacing, your bag would just be WOBBLY. Mine is stiff. No biggie either way.


STEP 3: Sewing. Here is the fun part. First, sew your strips into 2 LONG strips. Just put them right sides together and sew the short ends together. BTW...I serged everthing after sewing because I wanted my bag to REALLY hold up. CLEARLY sewing is enough---or you could zig zag the seams if you REALLY wanted.
OK now build a bag. Start with the lining. START with ONE side of your bag and the long strip. Fold your bag piece in half and mark the middle. Then match up the mid-seam of the LONG strip up with the middle of the bag. Pin right sides together. PIN WELL so that you don't get bunching around your curves. Sew carefully down, around the curve and back up the side. REPEAT on the other side. Then trim off the top of the side pieces to match the top of the bag. Voila....bag lining!!

Now for me this was a good time to take a little break. Head to the back yard. Play with the kiddos. Soak up some sun. Clearly this step is optional....BUT TOTALLY WORTH IT!!!

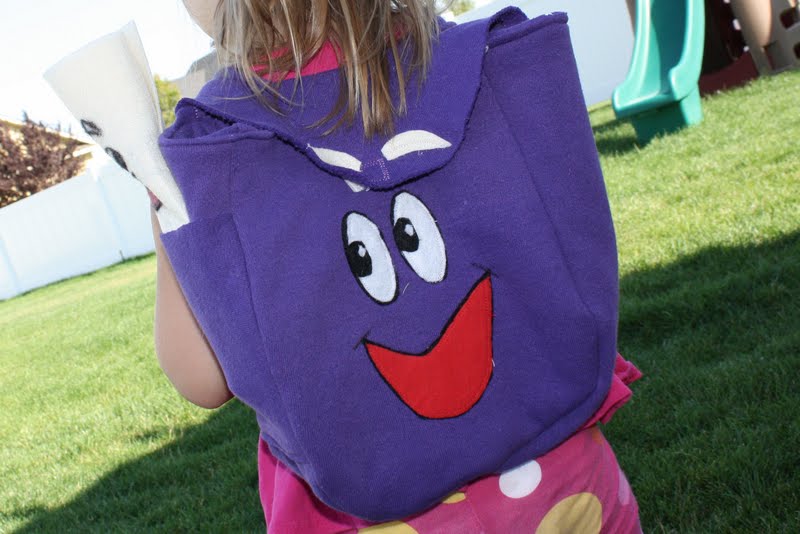
STEP 4: FACE TIME. Before sewing my outer bag, I created his cute little face. I made mine out of felt and old t-shirt scraps (cause I did not have red felt). I free handed it by looking at the face online. first I cut out the White of the eyes. THEN I cut out black ones a TAD bit bigger. SAME for the mouth. I could have used some fusible web, but I didn't---your choice. The only exception was on the back of the old shirt---it was too wobbly. I simply put the white on the black, stitched around the edge, and then repeated for the small black and small white. The only difference on the mouth was that I used fusible and then stitched. Then to make the corners of the mouth I just back stitched a few times. Cute little face DONE!!!!


Step 6: Hooking Up. Now it is time to start attaching things together. DISCLAIMER...don't look too close to my pictures here because I kinda sucked it up and forgot a few things. THEN I had to go back and make friends with my seam ripper. Do as I say...NOT as I do!!!
Next you are going to attach the handles to the bottom of the bag. SOOO you will want to take the BACK of the bag and follow the SAME instructions as above for attaching the sides. EXCEPT, you need to sandwich the straps in there too. SO you will have back of bag, strap, side of bag. Make sure that you strap is facing the right way---you don't want your ugly back seam to show.
Now you need to add a map pocket. I sewed HALF of my side piece onto the front and then stopped at the bottom corner. This helped me place the pocket RIGHT where I wanted it. I just made sure to cut the pocket a few inches WIDER than my side piece so that it would be sure to be caught in the seams. I folded the bottom of my pocket under and pinned it onto the side of my bag where I wanted it (although it wont fray so you could leave it raw). I did not fold the top of the pocket over---I left it raw. Tecnically Dora's BACKPACK has a pocket on BOTH sides, but I ran out of usable fabric (and patience). So I guess if you wanna be authentic....rinse and repeat for both sides.


TA DA!!! getting closer. Now you should have THIS. A lining and a bag with a face and 2 straps. Getting excited yet?????


OK...you want your bag to be right side out and your lining to be wrong side out. Then put your bag INTO your lining. That means that the right sides should be touching and the WHITE interfacing should be on the INSIDE of the bag. To make things more complicated, we have to attach the straps and the flap. Your straps should be sandwiched between the back of the bag and the linin. SOO on the back of the bag (the side without the face) you will have (starting from the inside of the bag and working out)....white interfacing facing in...back of bag (right side facing OUT).....Straps pinned on to the RIGHT side of the back of the bag....Flap pinned OVER the straps (right side to right side of outer bag)....and finally lining (inside out). PHEWW!! BTW I pinned my flap starting at the side seams on both sides.
OK now sew around the top edge leaving a large enough hole to flip it right side out. I sewed starting at one side seam all the way around and stopped at the that same side---leaving about 4 inches open to turn it.
NOW turn you bag right side out and think....wow....this lady really did know what she was talking about. You can even say it out loud if you want. PLUS be proud. You are almost done and it ACTUALLY looks like a backpack now.

STEP 8: Finishing touches. Now turn your opening edges in and pin. Top stich around the top of the whole bag. I sewed UNDER the straps, which means I had to stop and lift my needle to move the strap...just so ya know.
Next. Attach a little velcro.


Finally you can add your eyebrows. This was the worst part for me. Maybe because I was ready to PUNCH backpack by this time. Remember I had no nice lady walking me through step by step. I had to guess and check and UN-PICK!!! Anyway. I cut the eyebrows out of felt and sewed them to the flap. I just sewed ONE straight line down the middle fo the eyebrow because I could NOT make it work to sew around the outside edge---personal problem maybe.

Now just when you thought you were done.....YOU ARE NOT!!! I didn't want to get this darn thing done and have Emersyn say "but that doesn't even look like Backpack." OR " But where is the side pocket?" OR " What is that mom?" Oh the Horror!!! So I KNEW I needed a map. I was DONE with the whole cutting and sewing thing, so I used colored sharpies to make his face. MUCH EASIER.


THEN I made sure to draw a map on the inside. Complete with OUR house, the Grumpy Old Troll Bridge, a Stinky cow and a corn field. ALL of the things on the way to Grandma's House!!!
PHEWWWW. NOW you are done. Now wait for your kiddo to wake up from a nap so that YOU can be the hero.


OOPS!!!!
BTW... your map can also be used as an annoying hat for Little Brother!! Don't you just love items with MULTIPLE purposes??


GO!! GO!! Run right out and find an old sweatshirt QUICK!!!! Your little Explorer is waiting!!!!

1 comment:
You are such a good mommy! Love it! :)
Post a Comment