Saturday, June 26, 2010

Snazzy Towels


I am still trying to get in a patriotic American mood....so I thought I would snazz up some ugly towels I bought for the 4th.  Here they are.....
I am not sure why I thought I NEEDED these towels from the dollar store.  Am I the only one who buys things from the Dollar Store only to get home and think...What the heck was I thinking???  I think I see the dollar price tag and forget to look at the ACTUAL item.  Then I get it home....feeling all proud of the good deal...and then realize I do not actually NEED 5 mini herb pots or 7 bags of decorative rocks.  AND my daugther for sure does not need ANOTHER tiara or coloring book, BUT THEY ARE ONLY A DOLLAR!!!  ANYWAY...that is what happened with these towels.  I should have just paid an EXTRA dollar and gotten some ACTUALLY cute towels from Target, but..hey cheapness prevailed again.
I started with these not very cute towels and a blue starred bandana (a dollar at WalMart). 
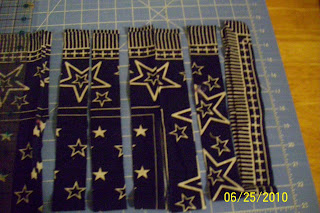
I cute my bandana into 1.5 inch strips.  6 strips for 2 towels.  I left the seams on the sides because I didn't really care and was in a hurry---but I think it would work better to cute the borer off and only use the stars---personal opinion.

I sewed a ruffling seam down the middle of the blue strip and then sewed the strips onto the towel.  I just left the edges raw because I like the frayed look.  I did do something a little different than my normal ruffles. I pinned my ruffle onto the towel and then sewed 2 lines---each 1/4 inch away from the ruffling seam.  I hate sewing over the basting stitch and THEN trying to remove the thread AFTER.  So I made two lines--one on each side of the middle basting stitch.  THEN I could just pull the basting stitch out in one shot.   Worked like a champ!!!
Much better than that boring old before shot.

Too bad this is where my towels usually reside---if not on the floor below the stove---SIGH!!!  ♥


Thursday, June 24, 2010

Jessica's Sweat Shop


Well..there has been a lot of sweatin' over here---but not because of all of the hard work I have been doing.  SUMMER BABY!!!  It is in full swing and I am lovin' it ♥  I have been a little hard at work though.  I am in the dress making business.  Same dress, different fabric (and sizes).  The tutorial for making this tank is HERE, or if you are feeling a little lazy you could just buy this one.  This little cutie is a 2T---without pockets this time---and a raw, rolled up hem. 

Again with the stripes.  This one is a size 3.  It also has a raw hem and two cutie patootie little pockets. 
Check the sidebar for both of these dresses if you would like to find it in your mailbox:)

COMING SOON!!!

I also had every intention of getting one of these up too, but I cut the stripes wonky---shrug.  Even 2 sizes too big for her it is kinda cute----but not "sell" worthy.  I cut out more today (minus the wonky-ness), so keep your eyes open for a few of these in the near future.

Wednesday, June 23, 2010

A dress for your sweetie!!

And.....what have we been up to over here....A little of this and a little of that, but mostly a little of SUMMER!!!  It has finally arrived here and TODAY we felt it---yikes.  I went fabric shopping yesterday and of course spent the evening trying out my new finds.  I decided to take THIS tank (from my previous tutorial) and lengthen it into a dress.  I kinda loved it---summery and CUTE!!! Kinda Retro or something...I AM and 80's girl I guess♥
I made it the same way I made the tank top, but added to it.  I added a cute little pocket and a lettuce edge---just for a change:)
BTW---this is my first attempt at putting a tag in my clothes---kinda love it.  If you don't--you should.  It makes you feel a little special for a little moment...even if it is one in the morning!!!


This fabric was SOOO cute and it turned out JUST as I imagined---SOOO I decided to share the love.  If you are interested in purchasing a dress like this for your own little darling---check my sidebar.  It is your lucky little tank top dress buying day. 


Monday, June 21, 2010

Dollar Tree Creations

I recently hit the dollar tree for some 4th of July crafting inspiration---I was not disappointed:) 
I found THESE:
A candlestick holder and an....I am not sure---ash-try, candy dish, candle holder.  Whatever it is...it is shaped like a star and is JUST what I was looking for.
I used Gorilla Glue to attach the base to the underside of the star.  Then I stacked my highly technical equipment---2 photo albums and a box of cat treats--onto them to keep them STUCK!!! 

Then I filled them with Red Hots and Peppermint Patty Bites. 
This was Baby Handy Pants favorite step ♥


Next I made these tierd servers---also from Dollar Tree supplies.  I saw something similar at Crap I've Made, but she used bowls and I decided to use cups so that there was more room on each tier. 
Here is what I used...

Plates (I also used round plates), cups, and super glue--which was also at the dollar store---who knew???
Same general idea.  Glue, stack, and then hold tight with books.

THEN REPEAT.  My only advice...make sure that the cups are lined up in the middle of the plates---notice how mine are WONKY!!!!  Also don't put too much glue around the edge of the cup or it will run down into the cup---also happenend to me (sigh).

Even wonky it is kinda cute---right???
I am thinking one stacked with cute red, white and blue cupcakes....AND maybe one with different chips and dip---what do you think???


Sunday, June 20, 2010

I WIN!!!

A few weeks back I won a giveaway and was MORE than excited.  I NEVER---not just saying that---NEVER win anything.  It is like a weird unbreakable curse---except maybe I just broke it---AHHHH!!!!  Anyway....the prize was a 40 dollar gift certificate to THIS etsy shop. Hello...40 dollars---super generous.  I had a super dooper hard time choosing what I wanted because everything was so cute and reasonably priced so I thought I would share some of the cuteness with you all and then you could run over there and check it out.  The shop is called. A Vision To Remember and there are tons of pre-made carseat covers and raggy blankets (other stuff too).  BUT also patterns for making your own as well.  Here are a few of the things I LOVED...
FIRST...I had a mad crush on this raggy quilt---LOVE the color combinations.  I didn't go for this though because I didn't want to LOSE money on my winnings---cheap I know.


Next--- my main purchase (or win) was this super cute carseat cover kit.  I love when other people pick the fabrics and then hand them over with a cute pattern.  CRAFTING HEAVEN for me.  PLUS I was SOOOO happy when the kit came in the mail because the pieces were already PRE-cut.  Hello!!!  I almost proposed to the owner of the shop right then and there.
BTW---my carseat is a combo of these same colors AND paisley---score!!!!  And BTW number 2---no I am not pregnant, but I know this will come in handy SOME DAY!!!

I actually got a few patterns, (but I honestly cannot remember all that I picked out), but I DO know that this cuter than cute John Deere quilt pattern came to my house.  LOVE IT!!!!
I also got the pattern for this belly band pattern.  I REPEAT....I am not pregnant.  I just did not have one of these with Kid 1 and thought I might try it SOME DAY!!!  PLUS if I continue eating the way I am, I might need one of these anyways...looks kinda comfy!!

I just cannot say enough nice things about this shop. Great products, great service, GREAT giveaway.  Go check out the cute stuff over THERE and I bet YOU wont be able to stop at just one item either---TRY IT!!!  AND then go enter a giveway---you just might win something freakin' fantastic!!!


Wednesday, June 16, 2010

From onesie to diaper cover

Now nobody likes their underwear to show, but MOST people do not have QUITE the problem that little ones do.  THEY just cannot sit around like little ladies ALL the time and they LOVE to wear pretty dresses.  I have had a bit of an obsession with making t-shirt dresses for a while now and I FINALLY decided that it was SiLLy to just throw away the bottom of the onesie.  SOOOO I decided to turn that waste into a little diaper cover.   Here is the run-down.
First, cut off the top of the onsie and keep it for your dress.
I used another diaper cover to get the approximate measurements---I just added a little bit to the top for my elastic casing.

This next step is probably not necessary, but I tried it anyway.  I sewed the crotch area closed.  You can see my terribly crooked seam right under the snaps---I was scared to hit the snaps, which resulted in a line that looks like it was sewn by a two year old:)
****If you are planning to add ruffles to the bum of the onesie---like I did---I would wait and sew the crotch shut AFTER sewing on the ruffles.  It will just make it easier to get the onsie around the arm of the machine.  Just a thought.
Next I turned the cover inside out--and sewed the top down about 1/2 inch---leaving a 1 inch opening for inserting the elastic. (I used 1/4 inch elastic because that is what I had--I think baby elastic would work just fine too). Then I used a safety pin and strung the elastic through the casing and FINALLY sewed the casing closed.

Voila!!!  Cute little diaper cover.  Not quite cute enough though----I wanted ruffles.  My little ruffle butt kid is TWO now and her days of wearing diaper covers and ruffles on her butt are quickly disappearing.  SOOO I want each of those days to be RUFFLED!!!
I had a few steps though between diaper cover and ruffle butt.  I had to make the matching dress:)  There are TONS of tutes out there for t-shirt dresses, so I will spare you, but I did do a few things differently.  For starters I had a long sleeved onesie and it is now JUNE, so I wanted to shorten the sleeves.  Good thing I am still on my sleeve shortening kick, so I followed the same general steps as I did in THIS tutorial. 

The only difference is that the end of the sleeve was not at all stretchy, So I just had to pin it on as best as a could and spread the pleats out evenly around the sleeve. I honestly was not sure it would work, but they ended up perfectly cute.
Ta-da!!! Short sleeves.

I found this knit remnant at JoAnne's for pretty much free and I LOVE how comfy this little dress turned out.  I made it more a tunic than a dress because I thought it would be fun in the summer, it would look cute with leggings, and because I have made her about a thousand dresses already for this summer. 
I didn't need to hem this, but I saw THIS tutorial for lettuce edge hems.  I thought it looked cute and girly and I was NOT disappointed.  Cute--check...Girly---check.  Then I added 3 rows of ruffles to the bum (there are tutorials EVERYWHERE for that) and DONE!!!!

Perfect for practicing somersaults. 

And even looks girlie when your Girl isn't acting GIRLY:)

Even when drinking sprinkler water off the slide (shrug---what can ya do???)
I see many of these in my BABY SHOWER future!!!!