Monday, November 28, 2011

Deck the Halls....DIY lighted topiary Christmas Tree

I TOTALLY Fa La La LA LOVE Christmas.  I love the decorations...the family togetherness....the songs....ALL OF IT.  On Friday I was SOOOOO super excited to have Thanksgiving over so that I could start decorating for Christmas.  Tree up....CHECK.  Look on Pinterest for new decorating ideas....CHECK.  I found a few inspirations HERE, HERE,HERE and HERE
Sadly I did not have a set of old school ice-skates hanging out in my garage.  BUT I did have this cute little sled chillin out there.  My dad picked it up for us last year at a yard sale.  YAY DADDY!!!  When I saw the pictures on Pinterest I almost killed myself digging through the crap pile in the corner of my garage.....WELL worth it for sure.  I have never decorated my porch (until this year) and I am loving changing it out for the different holidays...SO MUCH FUN!!!
Anyway...I had the sled.  I wrapped up some cardboard boxes filled with cinderblocks for the gifts.  I left out my Halloween straw bales for something to lean on.  AND I JUST NEEDED A LITTLE TREE.  I had two choices....go out into the BLACK FRIDAY insanity and try to find a mini tree for my milk can...OR head out to the crap pile for something to build one out of.  TO THE CRAP PILE!!!!

I grabbed some chicken wire(also in the scary corner of my garage) and formed it into a tree shape.  I pretty much just rolled it, flipped a few of the cut edges under the other ends and folded the wires over (to keep the ends together), and then pressed the top together until it made a tree shap instead of a tube.  It doesn't have to be perfect because the greenery will cover any small UGLYS:)  My model here helping me smush the top.  Christmas crafting is always WAY more fun with a happy helper elf...
 

I just made my tube a little bit bigger than my milk can opening.  Then I shoved the wire down in as far as it would go.  I put it down until the bottle started widening out.  It was super sturdy and I TRIED to pull it out or knock it over and it would not budge....LUCKY!!!
NEXT, I took my lighted greenery.  MINE was just a long strand of lighted garland.  Not the nice kind that looks real, but the cheap 5 dollar Walmart kind that is just one strand with no branches.  The branches kind would probably work well, but I already had the cheap stuff from another long lost christmas project that didn't happen.   I poked it up through the wire at the top of the tree and left the strand sticking up to make the point.  Then I wound the garland around the wire.  I overlapped here and there and tried to go under and around a few times to keep the garland from slipping down.  It stayed on pretty tightly. 
When I started I had NO idea if this would work.  But when I got this far I was almost dancing.  BUT then I decided that it was a little naked. 
So I grabbed some pre-made bows that I had (also from Walmart, also from years ago).  They had long ties on the back, so I strung them around the strands of greenery, through the wire and back out. Then twisted them.  I thought that would help keep the greenery from slipping around. 
AND DONE....Mini Tree Topiary Goodness:)

SOOOO the "decorate with what you have" saga continues at our house.  I am not gonna lie....I cannot wait to see what I find in the Crap Pile next:)

Friday, November 25, 2011

A few Thanksgiving memories...

I had a few successes (is that a word??) this Thanksgiving, so I want to put the links here on my blog so that I can find them again next year.  I hate when I have to search and search for the links that I have used in the past---darn that internet is a big place:) 
FIRST OFF...I have to admit something a little embarrassing.  I MADE HOMEMADE ROLLS by myself for the first time EVER!!!  I know...hard to believe for a 30 year old housewife.  BUT I have always let others do it, or been happy with the lovely rolls from the store.  BUT I saw this recipe (on PINTEREST of course) and got it into my head that I wanted to bake.  SO I DID.  It was so easy and actually kinda fun.  NOW if only bread didn't make me gain weight just by having it in the house...
 Just a warning...these have butter in the mix, then have butter spread onto the rolled out dough, and finally melted butter smeared on top. YUM!!! 
Now I realize I am the youngest child in my family and that by law my family cannot put me down.  AND I know that my family would praise me for bringing canned olives to dinner.  BUT despite that, they did ALL tell me how good these were.  SOOO I am pretty sure they meant it:)
These were seriously easy enough that my happy helper got to roll a few up.  AND she got to eat the first one (and she liked it)!!!
OK...enough about the rolls.  Another link I want to hang onto is for some Thanksgiving printable placemats.  I printed these up, cut them out, and glued them onto cardstock.  There were lots of different free printable mats, but these were the only ones I found that printed on regular 8.8x11 papaer.  Cannot beat that!!!   I took them for the kids table and they super enjoyed coloring away....worked like a charm!!!  BUT there were tons more free printable on the site...napking rings, centerpiece, banner, tons of stuff.  Next year I think I need to go all out.  Since I don't EVER have to cook the turkey, I should be in charge of something (besides canned olives). 
SOOO Thanksgiving is over....is it really time to take down the cute Fall decorations I just finished getting up????  Good thing decorating for Christmas is SOO much fun:)

Friday, November 18, 2011

Pumpkin Spice Sugar Scrub---good enough to eat:)

I just found my new favorite gift to give.  NOT KIDDING.  I pinned THIS a while back, and FINALLY decided to follow through.  I made Pumpkin Spice Sugar Scrub for the ladies I go visiting teaching too AND for Ms. Tonya the pre-school teacher extraordinaire.  This was SERIOUSLY simple.  Just mixing up oil and sugar and spice.   I used Sunflower Oil by the way.  The tutorial mentioned using vegetable oil, olive oil (kinda stinky), or many other kinds of oils.  I found a huge bottle of  Sunflower in the OIL aisle at Walmart for 3 bucks.  That made it the winner for me!!! 

If you have never used Sugar Scrub...you may not think this is such a great idea.  BUT IT IS.  I use this stuff on my dry scaly winter YUCKO hands and it works like a champ.  You can also use it on your elbows and knees if they get yucky.  I tend to crawl on the floor a lot with my kids or making crafts, so my knee caps are brown and dry.   This stuff sluffs it right off.  LOVE IT!!!  SOOO if you are looking for a gift for a co-worker, friend, neighbor, or just someone with dry skin....THIS IS IT.  BTW...I made one batch and filled one small, 2 medium, and 1 largish jars. 
The original blogger also has printable tags.  I printed them onto sticker paper and put the stickers right onto the jars and onto the lids.  I LOVED THE STICKERS.  It was much easier than using paper and adhesive and trying to attach them.  Stickers worked like a charm!!!

I also found the scoops at Walmart.  They came in a 3 pack (1small, 1medium, and 1 large) for about 3 bucks.  I am not gonna lie.  I pretty much think the scoops were the cutest part.  Is that lame????  Maybe so, but I am a little lame I guess;)  Do you know how lame I am????  Well lets just say that every time I look at this stuff or think about it I get a big smile.  Sugar Scrub+Jessica=BFFs!!!


Thursday, November 17, 2011

A little more Fall (and how to antique white paper)

 I realize that Thanksgiving is just around the corner, but we are still working on some last minute Fall Decor over at our house.  I have so many things pinned that I really wanted to make for Fall....I should be moving onto Christmas, but the procrastinator in me just wont let me!!!  I made THIS garland that I found on PINTEREST.  There are TONS of Free Printable garlands out there, so it was a hard choice for me!!!

 I DID have to go all MacGyver on this project to get it to turn out how I wanted, but the end result was JUST how I wanted it to look.  In case you are cheap like me, here is what I did (and why).  I ONLY have white plain printer paper.  No pretty cardstock or colors...just thin white yuckiness.  BUT I wanted this to last AND I wanted it antiquey looking....so I jimmy-rigged it. 
FIRST...I printed on the plain white paper. 
Next, I glued the white paper to black cardstock so that it would be more sturdy.
Third (and here is where it might get weird for you) I rubbed a wet tea bag onto the paper to make it brown.   As you can tell I REALLY wanted brown paper.  It worked great by the way.  The trick was to not get the bag tooooo wet, but not let it dry out.  If it was tooooo wet, it soaked the paper and the color didn't stick well.  If it was too dry, the bag ripped spilling yucky tea all over. 
Finally I cut out the letter (leaving a bit of a white border) and then set them under a heavy book to dry.  THEN I strung them up with twine.  BTW... I cut slits for my rope with an exacto knife.  IF you do that...make sure you knife is SUPER sharp.  If it is sharp, it cuts a pretty slit through paper and cardstock.  If it is NOT sharp....it cuts an ugly hole and pulls  the white paper in a jagged ugly mess.  FYI:)
 And if you are lazy like me, you will hang your garland up by placing ONE end of the string under a stack of books and the other under a vase.  AND THEN leave the long end of twine hanging down tackily to the side.  NOTE TO SELF...that stupid twine still has not been cut.  GRRRR for forgetting to do that before I took pictures:)
ON a seperate note, I found YET another FREE way to hang a FREE PRINTABLE.  I have this quote hanging in my kitchen (thanks Amy).  I decided it had just the right colors for a FREE PRINTABLE that I liked, SO I used some handy dandy tape and hooked it right to the board. 
SERIOUSLY...you cannot get much FREE-ER than TOTALLY free right??? 
I have had sooo much fun on my THRIFTY PANTS Fall decorations, I may just try to keep the thrify ball rolling for Christmas. 
PLUS I need to give a big THANKS to Pinterest...how did I ever get any ideas before????

Tuesday, November 15, 2011

A is for APPLE (sauce)


SOOOO for the last week I have pretty much been eating NOTHING by applesauce.  OK....that is a lie.  I have been eating birthday brownies, lemon bars (a birthday gift), and more double chocolate birthday brownies.  AND APPLESAUCE.  I FINALLY decided to try making my own applesauce and it was a SUCCESS!!!  Easy...check.  Cheap....check.  YUMMY...double check!!!!  
BTW...this was not healthy non-sugared applesauce.  As you can tell by the brownish color, this was brown sugary, delicious, almost like apple-pie filling applesauce. 
I started with THIS recipe that I found...of course on Pinterest.  Here is what I did. 
First I took all of my apples.  I had lots of different kinds.  I just dumped them all together.  I peeled and cored them by hand because I was not doing too many.  It took about 20 minutes for this large bowl.  I only cut them into 4ths...you just have to cook a little longer.  
I had around 15-20 small/medium apples.  I dumped them into a huge pot and added the following ingredients:
1.5 cups of of water
1.5 tsp of cinnamon
1 cup packed brown sugar (this is an estimate...kinda up to you how sweet you want it)
1 tsp salt
a squirt of lemon or lime juice (optional)
Then bring to a boil. 
Cover and reduce heat. 
Check out all of the brown sugar!!! 
Then....cook cook cook.  VOILA!!!!  Applesauce.  And the added bonus is that it tastes like apple pie and WHO doesn't like apple pie. 
I cooked for about 1 hour.  Every 15 minutes I stirred and mashed up the apples a bit. You will know when the apples are DONE!  Mash everything up and enjoy the lovely appley smell in your house.   
Then sit down on your couch and enjoy a big bowl of appley sugary goodness and watch a bit of Grey's Anatomy.  Seriously...nothing gets better than all that!!!

Friday, November 11, 2011

My most recent reads...

Although I have not been POSTING about reading....I have actually finished a few books in the last few months.  Some good, some not so good and some GREAT!!!!  Here is what I have had on my night stand..
THE FORGOTTEN GARDEN by Kate Morton.  This book was FANTASTIC.  I can honestly say (and remember I am an English teacher) that this is the most well written book I have read in a long time.  I LOVED IT.  It took me forever to read because it is big and thick and full of twists and turns, but WELL WORTH IT.  I cannot even begin to explain the main gist of this book...to much going on.  It switches back and forth between the past, the present, and the WAY past.  It jumps through generations in order to answer all of the questions.  The main question being...who is Nell and where did she come from...and why???  As a toddler Nell was found on the docks in Australia and adopted by a local family.  She does not know where she came from or why she is alone.  This book travels through time to find out WHO SHE IS.  Many times you think you know...and then WHAT???  You have no idea.  I loved the mystery of it.  And seriously you cannot figure out the answers unless you read the whole thing.  LOVE THAT!!!  I have also read The House at Riverton by Kate Morton and loved it also. 

Next I read Rachel's Secret by BJ Hoff.  I am not sure why I end up picking so many Amish books, but I just find their culture just so darn interesting.  In this one, Rachel is an Amish widow.  One night she gets a knock on the door and it is a white man with a gunshot wound and a black man.  They end up being conductors for the Underground Railroad and the whole thing causes problems in the quiet Amish community.  Rachel ends up having feelings for the man (which is a big no no!!) and outsiders begin causing problems for the Amish; barn burnings, verbal abuse, and finally kidnapping.  This was an OK book.  I am always interested in the Underground Railroad, but there was not enough about it in the book for me.
Of course that did not stop me from reading BOOK 2, Where Grace Abides.  Jeremiah stays in the community but cannot socialize with Rachel because he is not Amish.  More problems arise and MORE love problems.  Again...ok but not a great book.  I have not read the 3rd installment and am not too sad about it.
I realize I may have a problem, but when I see an Amish girl on the front of a book I just have to check it out.  BESIDE STILL WATERS by Tricial Goyer was my next read.  This was another OK, but not great book.  This book starts when an Amish family traveling home gets into a horrible accident.  Their buggy is hit by a Semi Truck and their 2 daughters are killed.  The mom, who is pregnant goes into labor and delivers a little baby girl.  Born on the day of  her sisters' deaths, Marianna always feels like she has to fill up the void left by them.  She tries to be perfect.  When she reaches marrying age, her parents decide it is time to move out of the community and go to Montana.  Although she love a local Amish boy she goes with her family.  They have to learn to live in the Amish community in Montana, which is NOT as strict in their beliefs and rules as their old community.  Marianna socializes with BEN, a local by and starts to fall for him.  She then has to decide whether to go back to her home and her Amish boy, or stay in Montana and deal with her feelings for Ben.  THEN right at the end you find out their is a book ....bummer.  I might have to go find it and see how it all turns out:)
This next book jumped off the shelf at me because of the title; LOVE FINDS YOU IN PENDLETON OREGON.  As soon as I saw Pendleton, I had to read it.  Sunny is the main character.  She is an out of work professor, Native American, and model.  She heads to Pendleton for a modeling shoot during the ROUNDUP and decides to look up her ancestors while she is there. I loved reading about the Roundup, I liked the stuff about Native Americans, but the love interest in this book was WAY OUT THERE.  It was one of those things where when it ends you are like...WHATEVER.   I am all about happy endings and chic lit, but I don't think anyone finds their true love and is ready for marriage in one week.  SOOO on that note, this book didn't do it for me. 

I really enjoyed this last one.  THE SHAPE OF MERCY by Susan Meissner.  Lauren is a super wealthy college student who tries to act NOT SUPER WEALTHY.  She lives in the dorm, goes to a state school, and wants to get a job.  She decides to take a job transcribing an old journal for Abigail, an older (also wealthy) lady.  The journal is from a young lady (Mercy) who lived during the Salem Witch trials and gets accusted of being a witch.  I liked learning about the witch trials and thought this book was pretty entertaining.  A good mix of past and present.  Speaking of present....my son has stopped sleeping AT ALL, so I may have a few (hundred) books to add to my list soon.  BLAHHH!!!

Wednesday, November 9, 2011

Fall is in the air~

I am still lovin' Fall over here.  We have been taking walks through our neighborhood, and the trees are AMAZING!!!  I super LOVE Christmas, but I would not be sad if it stayed Fall forever.  I love the weather, the food, and beautiful scenery.  I guess I also love the fun crafts too...although that is pretty much every season.
I am still on my mission to decorate my house without spending a whole lot. AND I am still in love with PINTEREST!!!  So I am trying to ACTUALLY accomplish some of the things that I pin.  I crossed 3 pins off my list this week....
First...I updated my candy jars from Halloween to Fall.  (AND I finally got all of the pirate decorations out of my house!!!)
I found these printable tags on Pinterest and wanted to use them for EVERYTHING.  It worked out great because there are 6 that print on a page and I only used 2.  SO that leaves some to use for fun fall gift tags!!!
I also wanted to have a piece of Fall subway art, but saw THIS one and fell in love.  It was a free printable...gotta love that.
 
I cut a piece of cardboard out of a diaper box with an exacto knife and then mod-podged the paper on.  Then I sanded the edges with sand paper and used some brown stain to distress the edges.  I wanted it to stand on its own, so I jimmy-rigged a stand out of more cardboard.
So this was a free project!!!  It looks silly from the back, but if you are looking that close, you are not welcome in my house:)
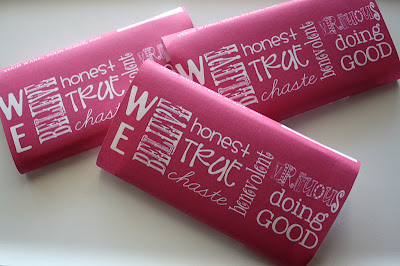
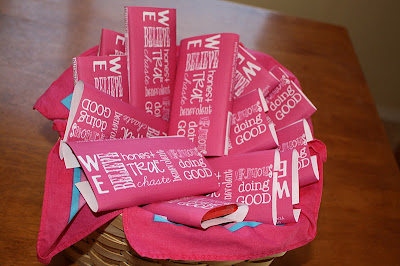
Project number 3 was another free printable for my Mia Maid classs.  This year the Mutual theme is the 13th article of Faith, so I fell in love when I saw these candy bar wrappers.  They are meant to go on a Hershey Bar, but I found Kit Kats on sale after Halloween and was TOO cheap to pass it up.  SOOO I made do.  They worked fine, but the wrappers didn't go all the way around the back of the bar.  NO BIGGIE!!
 Nothing like a bowl of cute chocolate to make a GOOD DAY:)   
Chocolate and Fall Leaves....LOVE IT!!!

Tuesday, November 8, 2011

NOW Fall is here!!

I made the first pumpkin cake of the year last night....SOOOO that mean Fall is officially here.  I know I share this recipe every year, but it is so simple and yummy.  2 ingredients and topped with whipped cream.  PLUS it makes your house smell like a dream.  And since it is made with pumpkin (a vegetable??), it must be super healty too:)

Wednesday, November 2, 2011

A few moments of craftiness

halloween 052

Amongst the crazy candy-ness of Halloween, I did have a few (precious) moments to myself.  Usually after midnight and in the dark, but still happySmile

Some of my free time is spent on Pinterest, which I love.  The only problem…I see what other people are doing and then I WANT TO DO IT.  I start to feel that my friends, teachers, kids, and Mia Maids must be suffering compared to others in other places.  Like all of those amazing places on the internet..haha!!!  So then I feel that I have deprived others of cuteness and start feeding my own inadequacies. 

WELL thank goodness I had a pirate party at my house this week because my church girls FINALLY got some of that Pinterest cuteness for themselves.  Our lesson was on virtue.  I found the quote first and then decided upon where to put it.  AND I was lucky enough to have chocolate gold at my house…pretty handy.  SOOOO I threw some gold in the bag, cut rectangles of scrapbook paper, folded them over the top of Ziploc snack bags, stapled the sides, and glued on the quote (which I had just typed up and printed on my computer).  I am not a scrap booker, so I just used scissors, Elmer's glue, and a stapler.  Nothing fancy here (actually most of it was a bit crooked and wrinkly).  BUT at least I felt like I accomplished something…like those amazing Pinterest folks always doSmile

halloween 050

  I had the same idea for the ladies I go visiting teaching to.  The idea was from PINTEREST.  I couldn't find black kisses, so I settled for purple, but I figured the witches I stole the hats from were just more stylish than those silly black Pinterest witches.   I also do not have a circle punch…nor do I know what one is, so I cut the old fashioned way and glued the circles to some card stock.  I am not gonna lie…I pretty much love the whole candy bag thing right now!!!halloween 046

And another small victory at our house…the soap dispenser.  I have also seen lots of monogramed and decorated soap dispensers on—you know where.  I don’t need my name on my soap, but I DOOOO need something cuter than  a dawn bottle on my counter.  I am CONSTANTLY cleaning bottles and HATE getting under the sink for the dish soap.  Sounds dumb, but with child proof cupboards, it causes me great anger.  SOOO I spray painted my dishsoap.  SERIOUSLY.  I just took it into the garage and spray painted it.  I didn’t do anything else they said…no primer, no taking off the stickers, nothing.   Just painted it.  It still isn’t pretty, but now it kinda just blends in.halloween 069

And another success.  The drying mat.  I was sick of either my counter being wet, or using all of the paper towels, so I made a drying mat.  I just sewed together some fabric and then sewed it to a super absorbent drying towel.  I got mine at WALGREENS for a dollar.  Perfect for all those darn bottle parts. 

SPEAKING of the bottle parts, I finally figured out a way to clean out DR. BROWN bottles.  We lost the little brush that came with them, and it was traumatic (for me).  I   used my somewhat unused brain and decided on PIPE CLEANERS.  SOO  if you are like me and need to clean the gunk out for your DR. BROWNS.  GO buy some crafting pipe cleaners (mine are sparkly halloween colors) and they work perfect.  TRUST ME.  I googled it and couldn’t find an answer….THIS IS THE ANSWER!!!  


SOOO that is all the boringness that is our crafting life over here.  I am super glad to be moving PAST halloween though…now on to tackling some Thanksgiving crafts on my to-so list!!!